Flutter Stateless and Stateful Widgets (2025 Code Examples)
Let’s practically understand what Flutter stateless and stateful widgets are. Here, we’ll discuss their role and how to properly implement them using multiple code examples with proper explanation.
After reading this practical guide, you will be able to use Flutter stateless and Flutter stateful widgets with ease in your own Flutter code as well.
Outline
- Understanding the Two Types of Flutter Widgets
- Syntax of Stateless and Stateful Widgets
- Practical Examples of Stateless Widgets
- Example 1.1: Simple Text Display
- Example 1.2: Button without State Change
- Example 1.3: List with Static Data
- Practical Examples of Stateful Widgets
- Example 2.1: Counter App
- Example 2.2: Toggle Switch
- Example 2.3: Dynamic List (with user input or data fetching)
- Conclusion
Introduction of the 2 Types of Flutter Widgets (Stateless and Stateful Widgets)
In Flutter, everything is working around its widgets. These widgets are the core elements that make up the user interface of an app, determining both its structure and functionality. Essentially, widgets are the building blocks of any Flutter application.
There are two primary types of Flutter widgets you’ll work with when designing interfaces:
- Stateless Widgets
- Stateful Widgets
1. Stateless Widgets
These widgets are simple and fixed. Once they’re set up, their configuration doesn’t change throughout their lifecycle. They are immutable, meaning their appearance remains the same unless the parent widget triggers a rebuild. Examples include buttons, icons, or a text label, things that stay constant unless something external affects them.
2. Stateful Widgets
On the other hand, stateful widgets are dynamic. These widgets can change their appearance during the app’s runtime because they store mutable state. When their state updates, the widget rebuilds to reflect those changes. A good example of this is a counter that increments or an input field where the value changes over time.
In more complex cases where you want or need to share state across multiple widgets efficiently, then here Flutter has InheritedWidget for you. By using this, you can easily pass data down the widget tree without having to pass it manually through constructors.
We’ll now understand their syntax and how to practically use both the stateless and stateful widgets. So, it’s easy for you to implement in your own Flutter apps as well.
Syntax of both these Widgets
1. Syntax of Stateless Widget
import 'package:flutter/material.dart';

class MyStatelessWidget extends StatelessWidget {
  @override
  Widget build(BuildContext context) {
    return // you can add your widget here like scaffold
  }
}
Explanation
1. StatelessWidget Class
You can easily define a custom widget by extending the StatelessWidget class as shown in above code.
2. build() Method
- The build() is a required method that returns the widget tree for the UI.
- The
contextparameter is passed to give contextual information to the widget (e.g., theme data, locale).
1. Syntax of Stateful Widget
import 'package:flutter/material.dart';

class MyStatefulWidget extends StatefulWidget {
   @override
   _MyStatefulWidgetState createState() => _MyStatefulWidgetState();
}

class _MyStatefulWidgetState extends State<MyStatefulWidget> {
// Declare state variables here

@override
   Widget build(BuildContext context) {
     return // add your widgets here e.g., scaffold
}
}
Explanation
1. StatefulWidget Class
You can define a custom widget by extending the StatefulWidget class. This widget does not directly store any mutable state.
2. createState() Method:
The createState() method returns an instance of the State class (e.g., _MyStatefulWidgetState) which will manage the widget’s state.
3. State Class
The State class holds mutable state and manages the updates. It must implement the build() method to return the UI based on the state.
4. setState() Method (optional for state changes):
When the state changes (e.g., user interaction), you call Flutter setState() to rebuild the widget and reflect the changes.
Summary of Syntax Differences between Stateless & Stateful Widgets:
StatelessWidget: It only needs one class (
StatelessWidget) and thebuild()method.StatefulWidget: While it needs two classes, one for the widget itself (
StatefulWidget) and another for its state management (State<T>), with thecreateState()method to instantiate the state.
Practical Examples of Both Stateless & Stateful Flutter Widgets
1. Code Examples of Flutter Stateless Widgets
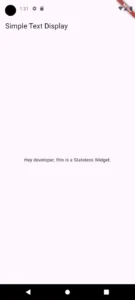
Example 1.1: Simple Text Display
import 'package:flutter/material.dart';

void main() {
  runApp(const MyApp());
}

class MyApp extends StatelessWidget {
  const MyApp({super.key});
  @override
  Widget build(BuildContext context) {
    return MaterialApp(home: SimpleTextWidget());
  }
}

class SimpleTextWidget extends StatelessWidget {
  @override
  Widget build(BuildContext context) {
    return Scaffold(
      appBar: AppBar(
        title: Text('Simple Text Display'),
      ),
      body: Center(
        child: Text('Hey developer, this is a Stateless Widget.'),
      ),
    );
  }
}
Explanation
- When you want to display static text in your app, you can use the Text widget. Since the text doesn’t change, a StatelessWidget works perfectly for this scenario.
- To center the text on the screen, wrap the Text widget in a Center widget. This ensures that the text is aligned in the middle.
- For displaying a title at the top, you can use a simple Flutter AppBar.
- Since everything stays constant, a StatelessWidget is ideal for this case.
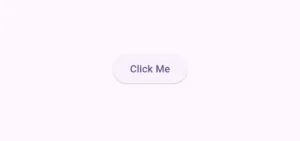
Example 1.2 Button without State Change
class SimpleButtonWidget extends StatelessWidget {
  @override
  Widget build(BuildContext context) {
    return Scaffold(
      body: Center(
        child: ElevatedButton(
          onPressed: () {
            print("Button clicked");
          },
          child: Text('Click Me'),
        ),
      ),
    );
  }
}
Explanation
- The ElevatedButton is a simple widget that lets you perform an action, like printing a message to the console when clicked. Even though it responds to user interaction, it doesn’t need to change its internal state.
- Because the button doesn’t need to track or change any state, it’s a perfect fit for a StatelessWidget. The button’s action that is just printing a message doesn’t affect the widget’s UI, which stays the same.
- To make the button work, use the onPressed callback to trigger an action (like printing to the console).
- So, while the button has functionality, it doesn’t rely on state changes, making it ideal for a StatelessWidget.
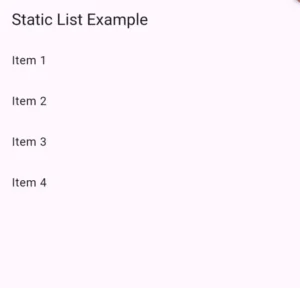
Example 1.3: List with Static Data
class StaticListWidget extends StatelessWidget {
  final List<String> items = ['Item 1', 'Item 2', 'Item 3', 'Item 4'];
  @override
  Widget build(BuildContext context) {
    return Scaffold(
      body: ListView.builder(
        itemCount: items.length,
        itemBuilder: (context, index) {
          return ListTile(
            title: Text(items[index]),
          );
        },
      ),
    );
  }
}
Explanation
- The ListView.builder widget creates a list dynamically based on a set of static data (items). Each item is displayed using a ListTile widget.
- The list of items is defined upfront and doesn’t change during the widget’s lifecycle. Because of this, a StatelessWidget is the right choice.
- The itemBuilder callback is used to build each list item, iterating over the static data.
- Since the list stays the same after it’s built, this example works well with a StatelessWidget.
Sometimes you want to put multiple widgets next to each other, but when they don’t fit on one line, you want them to move down to the next line automatically. The Flutter Wrap widget does exactly that as it arranges your widgets in a row or column and wraps them to the next line when needed. It’s great for things like tags, buttons, or chips that should flow nicely instead of scrolling.
2. Code Examples of Flutter Stateful Widgets
Example 2.1: Counter App
class CounterApp extends StatefulWidget {
  @override
  _CounterAppState createState() => _CounterAppState();
}

class _CounterAppState extends State<CounterApp> {
  int _counter = 0;
  void _incrementCounter() {
    setState(() {
      _counter++;
    });
  }

  @override
  Widget build(BuildContext context) {
    return Scaffold(
      body: Center(
        child: Column(
          mainAxisAlignment: MainAxisAlignment.center,
          children: <Widget>[
            Text('You have pressed the button this many times:'),
            Text('$_counter', style: Theme.of(context).textTheme.headlineLarge),
            ElevatedButton(
              onPressed: _incrementCounter,
              child: Text('Increment Counter'),
            ),
          ],
        ),
      ),
    );
  }
}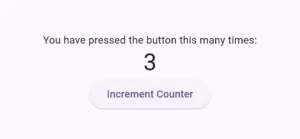
Explanation
- This example shows how a Stateful Widget handles user interactions and dynamically updates the UI.
- Here, the _counter variable tracks the mutable state, keeping count of how many times the button has been pressed.
- The _incrementCounter function uses setState() to update the _counter value and trigger a rebuild of the widget, ensuring the UI reflects the new count.
- Every time the button is pressed, the _counter value increases, and the UI updates automatically to display the new value.
- The ElevatedButton triggers the state update by calling the _incrementCounter method when clicked.
Example 2.2: Toggle Switch
class ToggleSwitch extends StatefulWidget {
  @override
  _ToggleSwitchState createState() => _ToggleSwitchState();
}

class _ToggleSwitchState extends State<ToggleSwitch> {

  bool _isSwitched = false;

  void _toggleSwitch(bool value) {
    setState(() {
      _isSwitched = value;
    });
  }

  @override
  Widget build(BuildContext context) {
    return Scaffold(
      body: Center(
        child: Column(
          mainAxisAlignment: MainAxisAlignment.center,
          children: <Widget>[
            Text(_isSwitched ? 'Switch is ON' : 'Switch is OFF'),
            Switch(
              value: _isSwitched,
              onChanged: _toggleSwitch,
            ),
          ],
        ),
      ),
    );
  }
}
Explanation
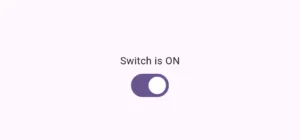
- This is a very good example of how stateful widgets can handle interactive elements, like switches, that dynamically update the UI based on user input.
- Here we implemented a basic Switch widget that toggles between ON and OFF states.
- The _isSwitched boolean holds the switch’s current state, and it changes whenever the switch is toggled.
- Each time the switch is toggled, the _toggleSwitch method updates the _isSwitched state and triggers a rebuild of the widget.
- The UI updates accordingly, changing the displayed text to reflect the switch’s state: either ‘Switch is ON’ or ‘Switch is OFF’.
Example 2.3 Dynamic List (with user input or data fetching)
class DynamicList extends StatefulWidget {
  @override
  _DynamicListState createState() => _DynamicListState();
}

class _DynamicListState extends State<DynamicList> {

  List<String> _items = [];
  final TextEditingController _controller = TextEditingController();

  void _addItem() {
    setState(() {
      _items.add(_controller.text);
      _controller.clear();
    });
  }

@override
void dispose() {
   _controller.dispose();
   super.dispose();
}

  @override
  Widget build(BuildContext context) {
    return Scaffold(

      appBar: AppBar(
        title: Text('Dynamic List Example'),
      ),

      body: Center(
        child: Column(
          mainAxisAlignment: MainAxisAlignment.center,
          children: <Widget>[
            TextFormField(
              controller: _controller,
              decoration: InputDecoration(labelText: 'Enter item'),
            ),
            ElevatedButton(
              onPressed: _addItem,
              child: Text('Add Item'),
            ),
            Expanded(
              child: ListView.builder(
                itemCount: _items.length,
                itemBuilder: (context, index) {
                  return ListTile(
                    title: Text(_items[index]),
                  );
                },
              ),
            ),
          ],
        ),
      ),
    );
  }
}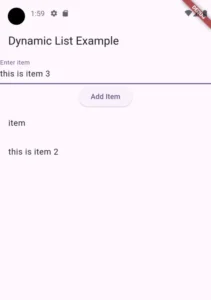
Explanation
- This code example shows how Stateful Widgets can manage dynamic data, allowing for real-time updates based on user input.
- Here, the _items list stores dynamic data that can be updated by the user.
- Using a Flutter TextFormField, the user can input a string, which gets added to the list when the button is pressed.
- The _addItem function takes the text from the TextEditingController, adds it to the _items list, and calls setState() to trigger a rebuild, updating the UI.
- The ListView.builder displays the updated list, and every time a new item is added, the list rebuilds to reflect the changes.
Conclusion
Here, we discussed the key differences and uses of Stateless and Stateful Widgets in Flutter. We discussed their roles and how to use them practically in multiple code examples so you can understand it better.
If you still have any issues, then comment or email us. We’d be happy to help you.
