How to use Flutter setState (2025 Code Examples)
Flutter setState is used to trigger the updation of the state of Flutter screen. Its importance and practical demonstration with simple and complex code examples will be discussed in this article for your better understanding.
After reading this article, you’ll have a detailed understanding of Flutter setState and how to properly use it in your Flutter app.
What is Flutter setState?
In really simple words, Flutter setState is a method of the State class that tells the Flutter app that some changes have occurred in the current screen and you need to rebuild that screen so the specified changes may show on the screen as well.
For instance, you want to change the background color of a button when the user taps on it. In this case, the setState in Flutter comes in, when the button is tapped then it tells that the screen should rebuild so the changes can be visible.
We’ll discuss its implementation using multiple code examples so it becomes super easy for you to use it in your app too as per your app requirements.
Where to implement setState?
In stateless widgets, the setState won’t work as they don’t change, they only work inside stateful widgets as they are able to change. The reason is that when the stateful widget is created then it has a State object and so that you can use/call the setState method.
We’ve created a practical guide on Flutter stateless and stateful widgets as well, in case you want to know more about them.
Syntax
setState(() {});Explanation
- The setState is a method of State class.
- The ((){}) is a function that has no name and inside its body you can easily write the code that you want the screen to have updates of it. For instance, variable having the counter increment values.
Examples to explain Flutter setState Practically
Example 1: Button Background Color Change with setState Flutter
bool colorChanged = false;
MaterialButton(
        onPressed: () {
          setState(() {
            colorChanged = true;
          });
        },
        color: colorChanged ? Colors.red : Colors.green,
        child: Text('Tap Me'),
      )

Explanation
- Here first I created a variable of bool and set it to false.
- Then a Flutter material button and inside its onPressed function, I’ve set the bool value to true of the variable I created. You can see that inside it,
- I’ve used the setState as well so whenever this button is tapped, then the rebuild of the screen will take place means the state will get updated.
- You can see a one-line if else statement for color constructor as well. It means that is the colorChanged value is true, then set the Colors.red or else assign the value Colors.green.
- I also used a simple text widget to show a Tap Me text inside the button as well, so it’ll look good. You can use other widgets as well like Flutter card and wrap with gesture detector to make it tappable.
- In the first image, the color is green as the bool is false, but after clicking the button, the value is changed to true, and by Flutter setState the state of the screen is updated as the rebuild occurs and the color is now red.
- If you want the color to change like when tap on the button again it shows the previous color and vice versa. Then you use it like this, colorChanged = !colorChanged; Now if the color is red then it’ll set to green, and if green then to red. Tap on it again and again and the color will change between red and green.
Example 2: Textfield Validation check using Flutter setState
In this example, we’ll create a simple Flutter textfield and a button. We’ll enter an email and by pressing a specific button, it’ll check whether the email is valid or not, if valid then it’ll show a validated message, and if not then an error message. The message will be shown on the screen with the help of setState as the UI has to get updated to show the text. So, let’s get started step by step:
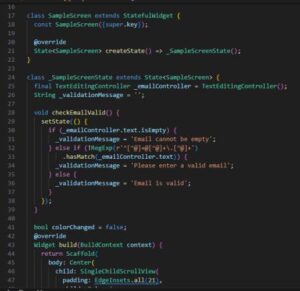
Step 1: Text Editing Controller for input data
final TextEditingController _emailController = TextEditingController();
Step 2: String variable for validation message
String _validationMessage = '';
We’ll assign a specific text to this variable like ‘Email valid‘ or ‘Email invalid‘ depending on the result. You can assign any text to it as you want.
Step 3: Method to Validate the input
void checkEmailValid() {
setState(() {
if (_emailController.text.isEmpty) {
_validationMessage = 'Email cannot be empty';
}
else if (!RegExp(r'^[^@]+@[^@]+\.[^@]+').hasMatch(_emailController.text))
{
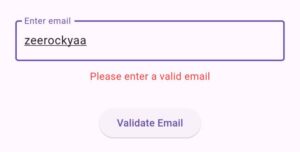
_validationMessage = 'Please enter a valid email';
} else {
_validationMessage = 'Email is valid';
}
});
}- This method is using the if-else statement.
- First, it’ll check if the email is empty, meaning the user haven’t entered anything and pressed the button then the message will show that ‘Email cannot be empty‘.
- If it’s not empty, then it’ll check the email characters with Reg Exp to see if the email has valid characters or not. If the email is not validated, then the else block will run.
- In these blocks, we can see that the string variable we’ve created is being assigned specified strings depending on the conditions.
- Also, in order to show the text on screen, we’re wrapping the logic inside the Flutter setState so the UI gets updated and the message is shown on the screen.
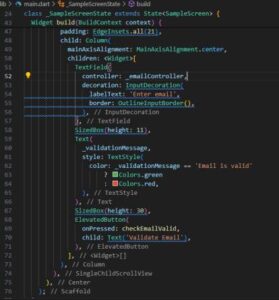
Step 4: Flutter textfield to take input
TextField(
                controller: _emailController,
                decoration: InputDecoration(
                  labelText: 'Enter email',
                  border: OutlineInputBorder(),
                ),
              )

Step 5: Validation message
 Text(
     _validationMessage,
     style: TextStyle(
      color: _validationMessage == 'Email is valid'? Colors.green: Colors.red,
              ),
            )

Here the updated text will be shown using the setState. When the function of email validation is called then the result text message will be shown here when the screen rebuilds using the setState method.
We’ve specified that if the text is ‘Email is valid‘, then set the text color to green, or else make it red.
Step 6: Elevated Button to trigger the function
 ElevatedButton(
          onPressed: checkEmailValid,
          child: Text('Validate Email'),
              )
Step 7: Test it
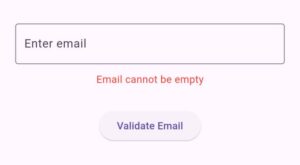
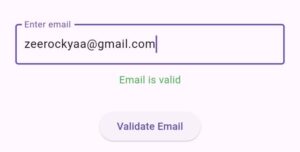
- First we didn’t pass anything and pressed the button.
- Then we passed an invalid email string and pressed the button.
- Finally, we passed a valid format email and trigger the function by pressing the button. You can see that the text changes and this is done using the setState as the updated text is shown when the screen rebuilds to show the updates on this specified screen.
This is also one of the way you can make use of the setState in Flutter.
Code Images
Conclusion
So this is how you can easily use the Flutter setState in your own Flutter app as well. I’ve tried to explain the use of setState in Flutter and why it won’t work with stateless widgets in an easy way, but still, if you have any questions, then do email me or comment here. I’ll be pleased to answer it.
Also, do visit my other posts on other amazing Flutter concepts, Flutter widgets, and more. Thank you.